 |
| © Janel Jacobson All Rights Reserved |
Studio & Tools
|
|
|
|
|
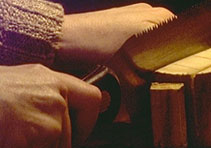
After
selecting the particular material for a carving, I mark the cut
lines and begin to saw. My tools for this step are simple,
a Japanese style saw that cuts on the pull stroke, or a short saw
that cuts on the push stroke. I do not use a power tool for this
step. |
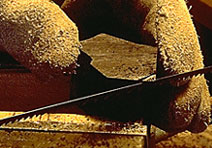 Preparing African Blackwood for carving "Rat" |
Once
the material is blocked out at the workbench, I move to the carving
bench and consider the intended subject's placement within the limits
of the material. Some rough lines are sketched and the next
phase of roughing out unwanted material begins with the use of an
electric micro-grinder. This step is the most lively work
during the weeks of time I spend carving each piece. It lasts
for perhaps a day or for just hours. |
During the use of the
power tool, I wear ear plugs to block out most of the sound of the
tool. I also have a dust collector placed just to my left
to filter out most of the dust which flies from the tool tip
during the grinding process. Wood dusts and that of many other
kinds of materials are harmful to breath, so some sort of dust collection
is important. |
|
|
|
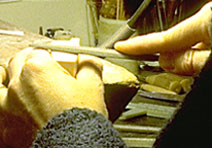
When
I am finished with the power tool, I turn to a few favorite files
to remove more of the material, in a more controlled manner. Small
carving blades and gouges start to find usefulness now. Many of these are made from |
I work on the whole piece in stages, trying to never get too far ahead on any section. As the carving progresses, the smaller tools come into use. When fine control with the placement of the tools is necessary, I add the antique binocular loupes to my carving glasses. |
|
Sanding progresses in stages using a range of grits of sand papers. The I have on hand are: 100 (rarely used), 220, 320, 400, 600, 1000, 1500, 2000. I select papers that are considered useful for both wet/dry applications. Some come from the local hardware store, the others from the auto parts store. Some materials require even finer grits to bring a polish to glistening perfection. For this, I have been using a liquid polishing compound that is used to remove haze and fine scratches from plexi-glass. |
|
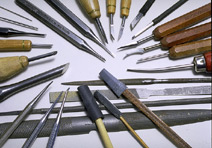
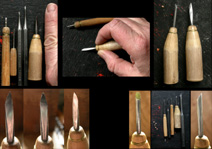 Often Used Tools |
Many of my tools are made as I need them. I am also interested in the tools that other carvers use. The tools pictured on the left of the picture were inspired by tools designed by Steven Myhre, a bone carver from New Zealand. Komada Ryushi introduced me to his Japanese netsuke carving tools at the International Netsuke Society Convention 2004, a very good treat for me. |
As time progresses, I will add images and text to further illustrate carving and finishing the little pieces I carve. |
|